
She’s iconic. She’s spooky. And she looks absolutely *gorgeous* in glitter vinyl. This DIY Bride of Frankenstein project is a sponsored post with StyleTech Craft Vinyl but all ideas and opinions are my own.
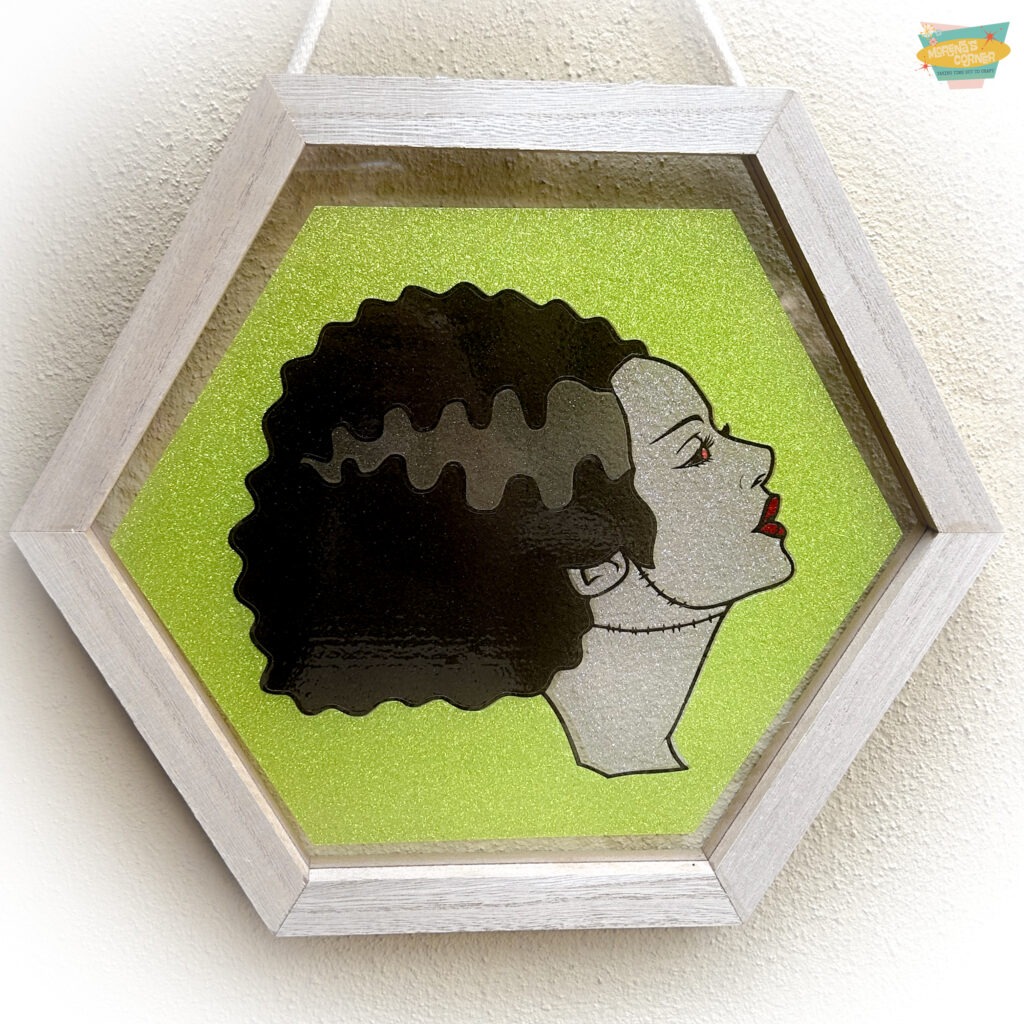
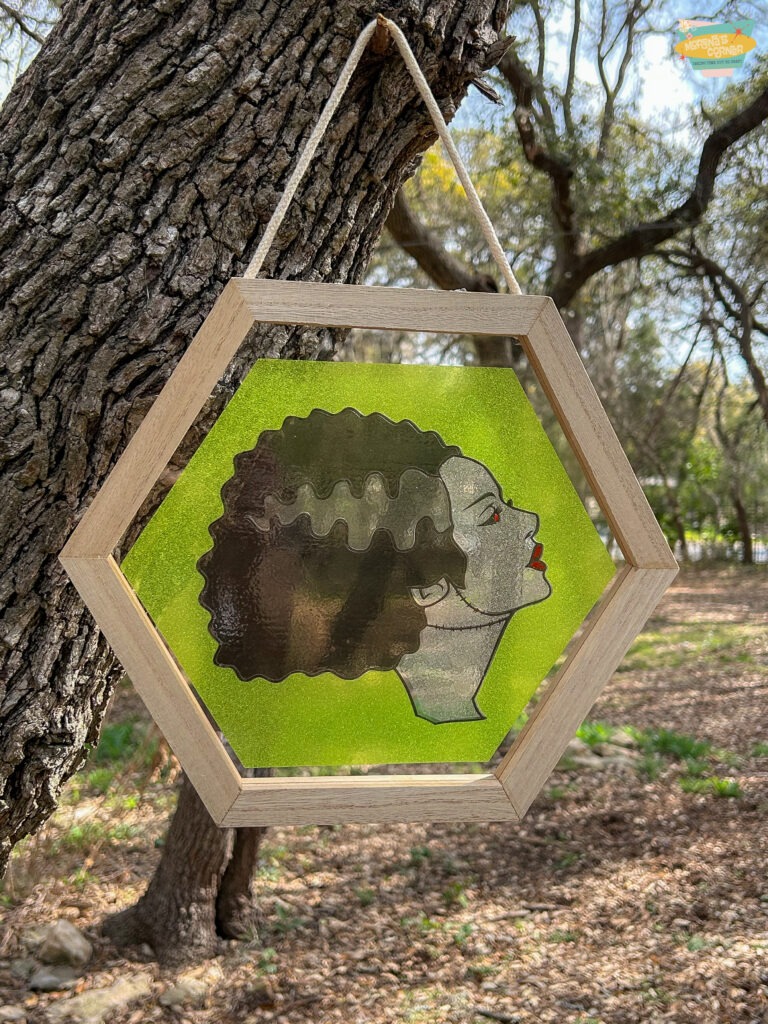
If you’ve been looking wall decor project that’s a little outside the box — or in this case, inside a hexagon — this Bride of Frankenstein faux stained glass piece is it. I’m layering StyleTech Craft glitter vinyl over a Plaid hexagon frame to create a look that catches the light just like real stained glass. The result is moody, sparkly, and just the right amount of creepy-cute.
Fair warning: this one takes a little patience with the alignment, but the payoff is *so* worth it. Let’s get into it!
DIY Bride of Frankenstein Vinyl Wall Art Supplies List
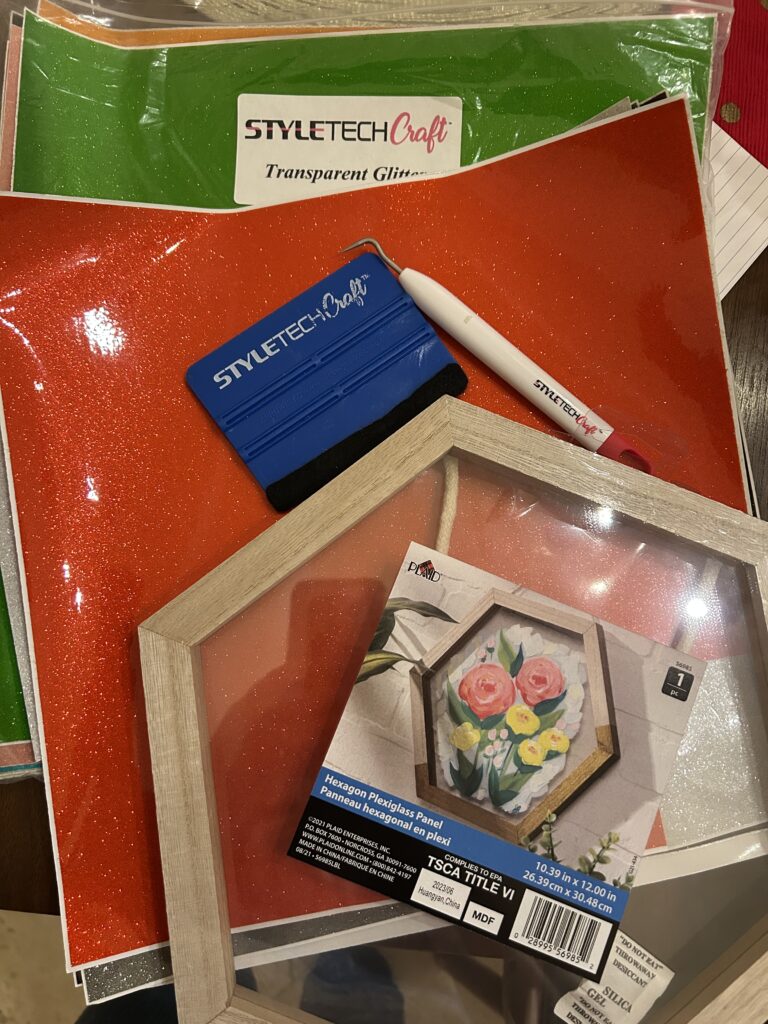
– StyleTech Craft Transparent Glitter Vinyl
– Transfer tape (clear is recommended so you can see your placement)
– Weeding tools
– Squeegee or scraper tool
– Plaid Crafts Hexagon Frame with Plexiglass Panel (item #56985) — it comes with a built-in clear plexiglass insert, which is perfect for this project!
– Silhouette cutting machine (Cameo or Portrait)
– DIY Bride of Frankenstein SVG File free for personal use only
Step 1: Download the Free SVG and Prep Your Design
Step 2: Cut Each Vinyl Layer
Cut each layer from its corresponding color of StyleTech Craft glitter vinyl:
– **Black glitter** → the outline/frame layer (this is the big one!)
– **Green glitter** → the background piece
– **Silver/white glitter** → the skin/face
– **Dark glitter** → the hair pieces
– **Red glitter** (or regular vinyl) → the small eye and lip accent details
Keep your cut pieces on their backing until you’re ready to weed and layer — this helps prevent any accidental sticking or shifting.
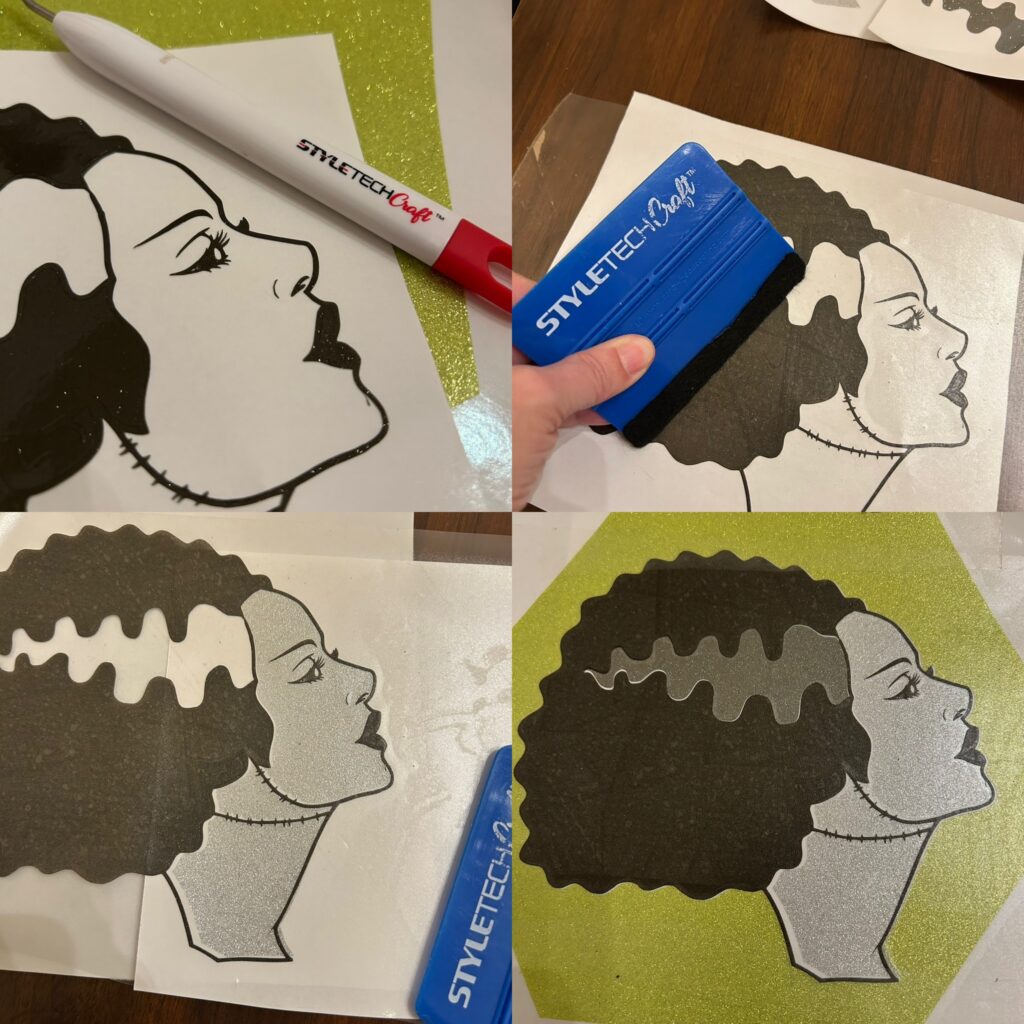
Step 3: Weed Your Vinyl
Weed all of your cut pieces carefully, removing the excess vinyl from around each design element. StyleTech Vinyl is perfect for detailed designs like this one, and it weeds so easily!
Step 4: Build Your Layered Design (The Trickiest Part!)
This is where the magic happens — and yes, this is also the step that requires the most patience. Here’s the layering order:
1. **Start with the black outline layer.** Apply transfer tape to the top of the black glitter vinyl and carefully lift it off the backing.
2. **Layer the skin piece onto the black outline.** Using the outline as your guide, align the silver/white skin vinyl underneath the black frame. Burnish well with your scraper.
3. **Add the hair pieces.** Position the dark hair vinyl pieces into place and press them down firmly.
4. **Press the full assembled design onto the green background.** Once all your character pieces are together, carefully transfer the whole design onto the green glitter background piece. Take your time lining everything up — this is the step where alignment matters most!
5. **Transfer everything to the hexagon backing.** Apply the completed layered design to the plexiglass insert inside the Plaid hexagon frame. Use a squeegee to press it down firmly and smooth out any bubbles.
Step 5: Add the Small Red Accent Details
Once everything is adhered to the frame, add your tiny red vinyl details — the eye accent and the lip color — directly on top of the design. Because these are small and go on last, it’s much easier to get them perfectly placed without messing up your other layers.
Step 6: Hang and Admire! 🖤
The Plaid hexagon frame comes with both a jute rope hanger and a sawtooth hanger on the back, so you’ve got options for how to display it. Step back, hang it up, and watch it catch the light. That StyleTech glitter vinyl absolutely *glows* — it really does look like a stained glass window!
Tips for Success
**Alignment is everything.** The hardest part of this project is getting all the layers to line up correctly before pressing down for good. Don’t rush it — reposition as needed while things are still on the transfer tape.
**Clear transfer tape is your best friend.** Being able to see through the tape makes placement so much easier.
**Press firmly and completely.** Glitter vinyl has a slightly different texture than regular vinyl, so take extra time to burnish each layer, especially over the plexiglass surface.
**Do a test cut first!** Glitter vinyl cuts differently than smooth vinyl and settings can vary by machine.
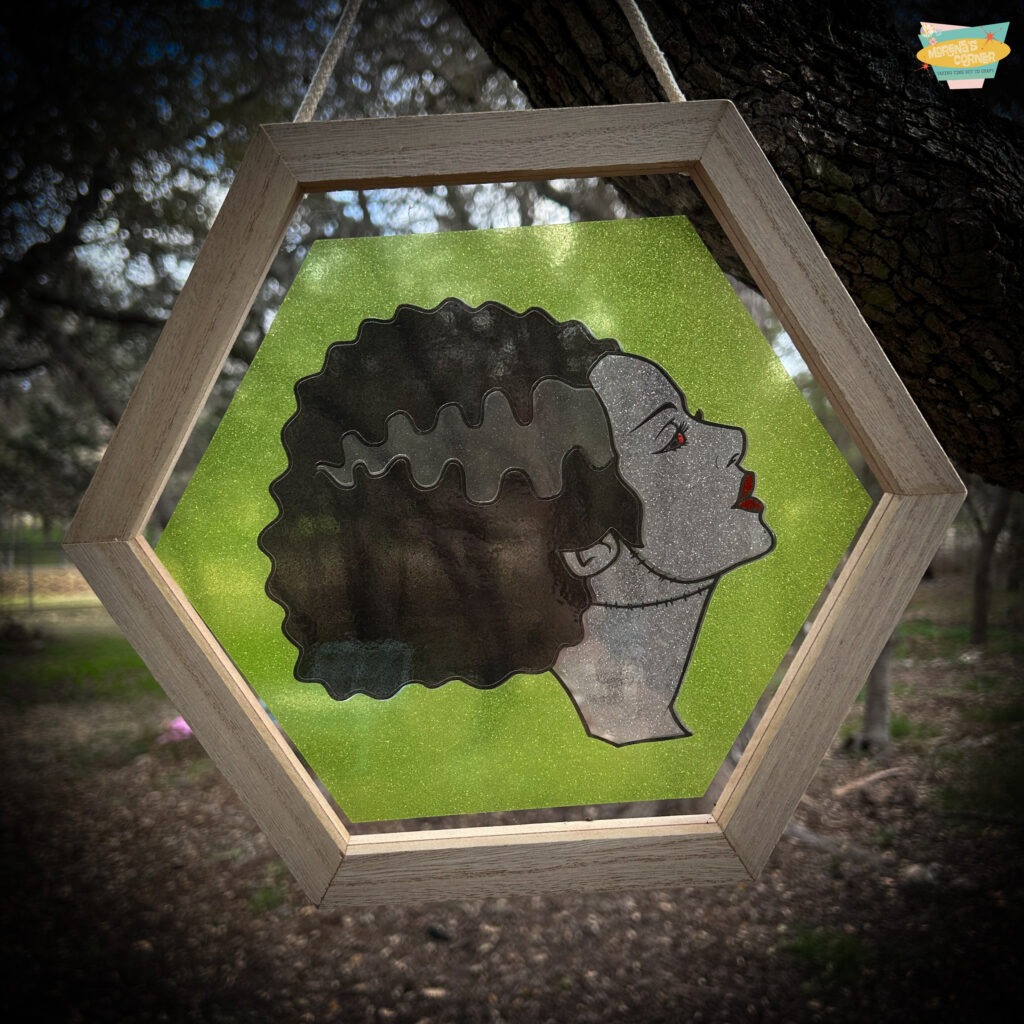
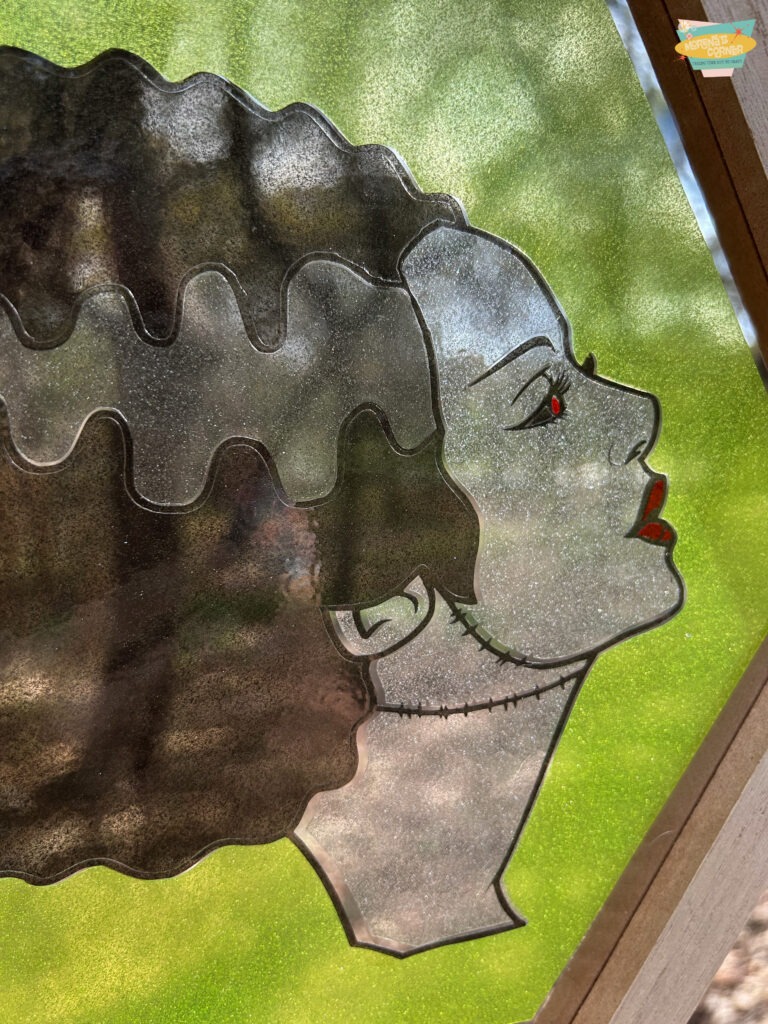
The Finished Look
The combination of transparent glitter vinyl on the clear plexiglass creates that gorgeous faux stained glass effect — light passes through and around the layers, making the whole piece shimmer. The green background really pops against the sparkly black outline, and those tiny red details on the eye and lip bring the whole character to life.
Whether you’re a Halloween decorator or just a fellow monster movie lover, this one’s a keeper. 🖤

*Did you make this project? Tag me on social media — I’d love to see your version! And if you found this tutorial helpful, save it to Pinterest so other crafters can find it too.*
Leave a Reply